How to add text to your photos in Google Photos

Here’s a step-by-step guide on how to add text to your photos in Google Photos. I’ll cover the process on Android, iOS devices, and Computers so it helps you add text to your photos easily.
how to add text to your photos in Google Photos on Android phone
If you follow the steps then you will easily learn how to add text on Google Photos with your Android phone like Samsung, Oneplus, Oppo, Vivo, Motorola, etc Android mobile.
Step: 1 Open Google Photos: Locate and open the Google Photos app on your Android mobile.
Step: 2 Select Photo: Choose the photo you want to add text to.
Step: 3 Edit Button: Tap the “Edit” button at the bottom of the screen (it looks like three horizontal lines).
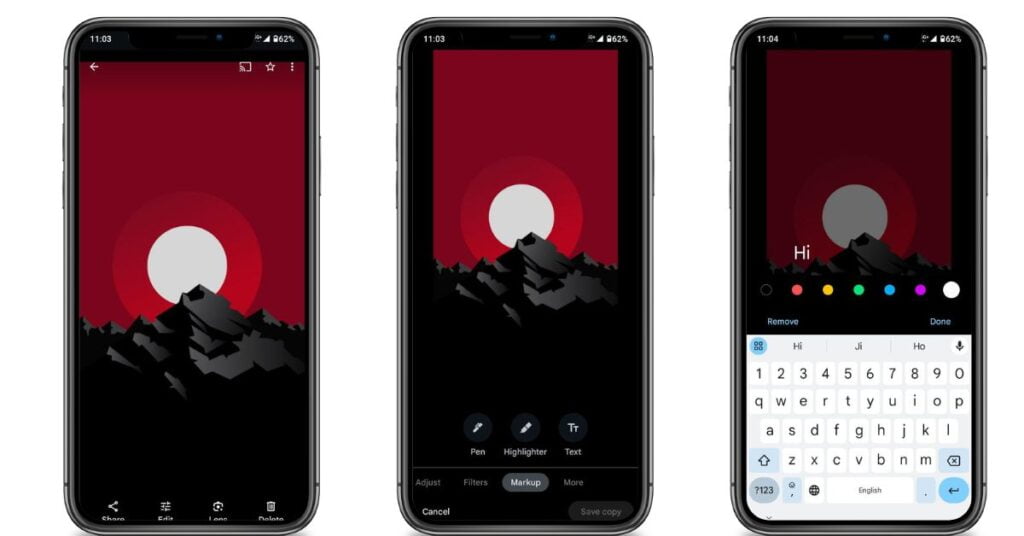
Step: 4 Markup Tool: Scroll to the right in the bottom menu until you find the “Markup” tool and Tap it.
Step: 5 Text Tool: Tap the “Text” tool.
Step: 6 Type your Text: Enter the desired text into the text box that appears.
- Customize (Optional): you want to change the text color, font size, and style if desired.
Step: 7 Position the Text: Just tap and drag the text box to your location on the photo.
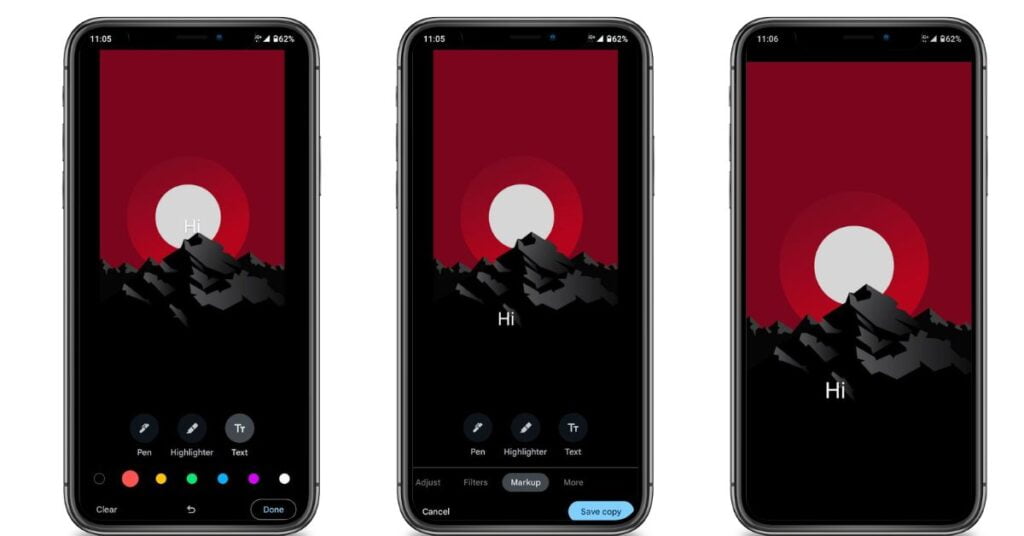
Step: 8 Save: Tap “Done” in the top right corner, then tap “Save Copy.” this creates a new copy with added text on the photos.
iOS (iPhone/iPad)
Follow these steps and you will learn how to edit text on a photo on iPhone or iOS devices.
Step: 1 Open Photos App: open the default Photos app on your iPhone or iOS device.
Step: 2 Select the Photo: Locate the photo that you want to edit and tap on it.
Step: 3 Edit Button: Tap on the “Edit” button in the top right corner of the screen. ( Pencil icon )
Step: 4 Markup Tool: Tap the button (…) at the bottom right corner, then select “Markup.”
Step: 5 Text Tool: Tap the plus sign (+) and choose the text you want added “Text.” A text box will appear on the image.
Step: 6 Type your Text: Double-tap on the text box and begin typing.
- Customize (Optional): Modify the color, font, and other text attributes using the options that appear.
Step: 7 Position the Text: Position the text where you want by dragging the text box.
Step: 8 Save: Tap “Done” in the top right corner, and then “Done” again to save the changes.
Conclusions
I have cleared all your doubts about how to add text to your photos in Google Photos on your Android mobile and iPhone devices, so I hope this article has helped you if you have any questions related to this topic. If so, you can ask in the comments.
Faqs
Q: How to write text on a photo iPhone?
A: You can use photo editing apps designed for iPhones. Popular options include:
PicsArt
Canva
Phonto
Q: How to add text to Google Photos on iPad?
A: Google Photos for iPad doesn’t have a text-adding feature. You’ll need to use a separate photo editing app.
Q: How do I add text to Google Photos on my PC?
A: Google Photos doesn’t currently have a built-in feature to directly add text to images. However, here are a couple of ways to achieve this:
Source | Via


